Cleaning Audio Channels TUTORiAL
FANTASTiC | 25 November 2020 | 111 MB
How to prepare your audio for mixing by using band pass equalisation for cleaning and making sure to shape the filter slopes to match the audio’s response.
Band Pass Equalisation – cleaning audio channels video tutorial explains what band-pass equalisation is and how to use it to clean audio channels for mixing.
One of the most important processes in music production is that of using corrective equalisation to remove redundant and problematic frequencies from audio prior to mixing. We refer to this process as cleaning.
The type of equaliser filter I use for all cleaning tasks is a band-pass filter.
So, why band-pass? Because what we are trying to achieve is to remove low end frequencies that are not needed and high end frequencies that are also not needed (which many seem to ignore). These are called redundant frequencies. The frequencies we keep are the frequencies we are going to process.
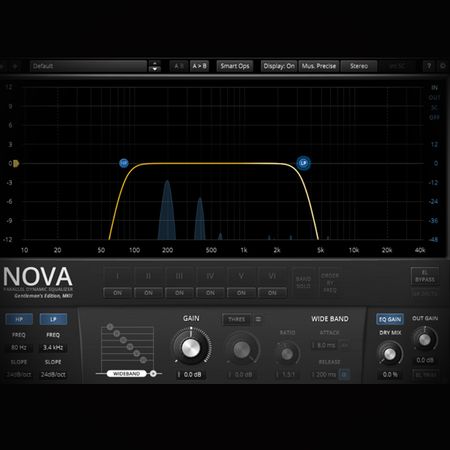
In the image above you can see the redundant frequencies sitting at around 10 kHz. They are visible but cannot be heard. So, why keep them?
Band-pass filtering
I always start by inserting hi-pass and low-pass filters at either end of the spectrum. In effect I am using band-pass filtering/equalisation.
A filter that passes frequencies between two limits is known as a band-pass filter.
A band-pass filter attenuates frequencies below and above the cut-off and leaves the frequencies at the cut-off. It is, in effect, a low-pass and a hi-pass together. The cool thing about this filter is that you can eliminate the lower and higher frequencies and be left with a band of frequencies that you can then process without the worry of redundant frequencies creeping up on you and summing gains and tripping compressors.
A filter that adjusts the levels of frequencies between a pair of values is known as a peaking filter
Once I have the two filters in place I start to move them around until I have cut all the frequencies not needed.
Bandwidth – also known as Q
Bandwidth, in this context, is a simple measurement: it is the width of the frequency range selected. In other words, it is the range of frequencies allowed to pass through the equaliser. The width of a peaking filter is defined by its Q value, where Q is the filter frequency divided by the width in Hertz of the band the filter affects. A high value for Q corresponds to a very narrow filter, whereas a low value of Q corresponds to a wide filter.
Slope or Gradient
Filters do not have a no-effect at a frequency and then instantly jump and suddenly reappear at the next frequency. They have to get there somehow. The way, and by how much, they get there is called the gradient or slope. In the case of the shelving filter, the most common slope is 6 dB gain change per octave (doubling of the frequency). It takes time for the filter to attenuate frequencies, in proportion to the distance from the cut-off point. This is the slope.
When cleaning, the slope of the eq/filter is as important as to where you set your cut-off. They can be designed with varying degrees of steepness expressed in dBs/octave where the more dBs, per octave, the steeper the filter. I always extend an eq’s display to show a much broader range as this will invariably cover all the slopes. This then allows me to shape and match the eq slope to the response of the sound. This makes for a much smoother and accurate cut.
Let us take vocals as an example:
A drastic slope can be unnatural when filtering vocals whereas a smooth slope can help to get the vocals to sit more naturally in the mix. Again, this comes down to taste and subjectivity but there does come a time whereby the integrity of the signal will suffer and this is usually the time to back off. If a 24dB/octave slope is too drastic on vocals then back off and select a smoother slope, maybe 12dB/octave.
In the Band Pass Equalisation – cleaning audio channels video, I explain what a band-pass filter is, how it works and how best to use it for cleaning audio channels. I show you the industry techniques we use to clean any piece of audio. I explain slopes and gradients in detail and show you how to match the filter’s slope to the response/shape of the audio being processed.
The plugin used in this video:
•TDR Vova GE
Topics covered in this video are:
•How to prepare your audio for mixing with Band Pass Cleaning and Matching Filter Slopes
•What is band-pass cleaning and how does it help
•What is ‘matching slopes’ and ‘matching gradients’
•Learn an effective way of cleaning all your DAW’s audio channels
•Maximizing for effects and dynamic range
•Bleeding in/out
•Summing
•Gain staging
•Q factor and bandwidth